
Intro #
Debian (Trixie) has now officially support RISC-V. At the time of writing it is still in beta / first release candidate.
Hardware #
This is my hardware setup:
- StarFive VisionFive 2
- BEYIMEI PCIE Riser-Ver010X GPU Riser, 1X tot 16X (4PIN/6PIN/MOLEX) PCIE-verlengkabel, M.2 naar PCI-E Riser Card Bitcoin Litecoin Ethereum. This is about 11 EURO on amazon, so no big deal… amazon-link
- AMD/ATI Hawaii PRO [Radeon R9 290/390], Bought on a Dutch second-hand website, for 45 EURO. or ATI Radeon 5450, Bought on a Dutch second-hand website, for 10 EURO.
- An ATX power supply (was still lying around in the house)
- For debugging a USB to TTL (was still lying around in the house), is about 5 EURO.
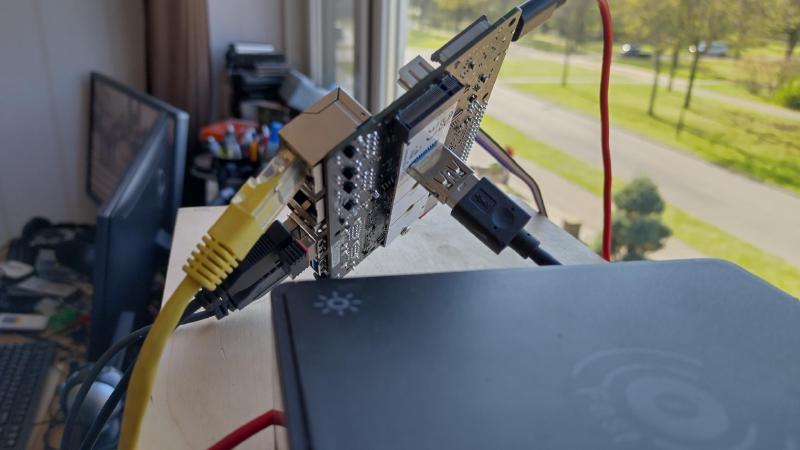
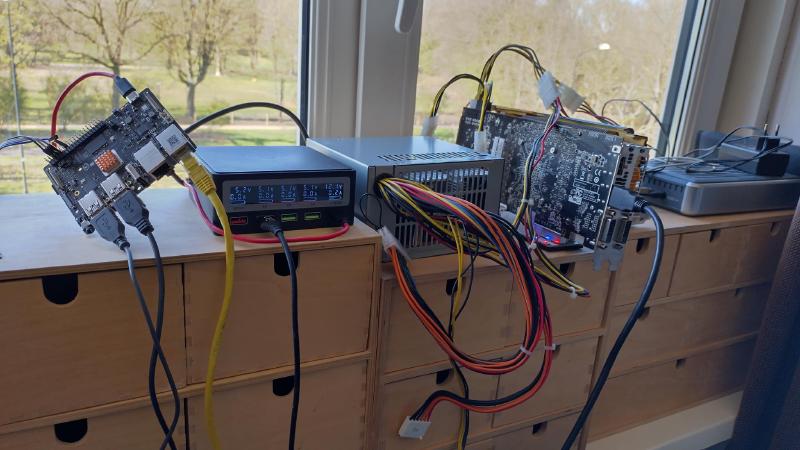
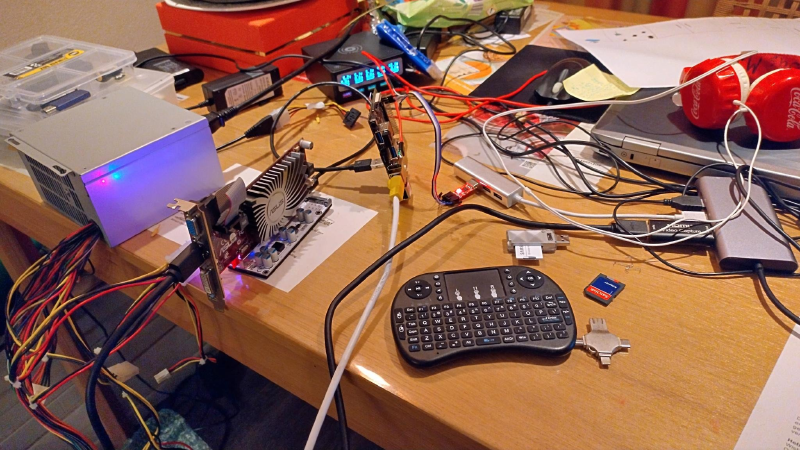
I created a “stand” for this all, see StarFive VisionFive 2 GPU stand (3D design).
Setup Debian Trixie #
I have my StarFive VisionFive 2 configured that it boots from SD-card, for more information see to doc from u-boot.
I will boot from SD-Card into the setup (with some U-boot commands). The setup iso will be on an USB device (iso). I will install Debian Trixie on my eMMC module. After the setup i still use the SD-Card but now to boot to the eMMC. I will only use U-boot from the SD-Card.
Download Debian Trixie #
At the time of writing the installer is still in develop, so the link for RC1 can be found here here. I downloaded the RISC-V DVD for riscv64, and the boot files that are needed
$ cd ~/Downloads
$ mkdir DebianTrixie
$ cd DebianTrixie
$ wget https://cdimage.debian.org/cdimage/trixie_di_rc1/riscv64/iso-dvd/debian-trixie-DI-rc1-riscv64-DVD-1.iso
$ wget https://cdimage.debian.org/cdimage/trixie_di_rc1/riscv64/iso-cd/debian-trixie-DI-rc1-riscv64-netinst.iso
# extract the netinst iso (for example with 7z)
$ 7z x debian-trixie-DI-rc1-riscv64-netinst.iso

7-Zip [64] 16.02 : Copyright (c) 1999-2016 Igor Pavlov : 2016-05-21
p7zip Version 16.02 (locale=en_US.UTF-8,Utf16=on,HugeFiles=on,64 bits,16 CPUs AMD Ryzen 7 2700X Eight-Core Processor          (800F82),ASM,AES-NI)

Scanning the drive for archives:
1 file, 638889984 bytes (610 MiB)

Extracting archive: debian-trixie-DI-rc1-riscv64-netinst.iso

WARNINGS:
There are data after the end of archive

--
Path = debian-trixie-DI-rc1-riscv64-netinst.iso
Type = Iso
WARNINGS:
There are data after the end of archive
Physical Size = 635740160
Tail Size = 3149824
Created = 2025-05-16 01:51:48
Modified = 2025-05-16 01:51:48

Everything is Ok

Archives with Warnings: 1

Warnings: 1
Folders: 475
Files: 1231
Size:       789563228
Compressed: 638889984
Compile the latest version of U-Boot #
Debian Trixie delivered no U-Boot, so we need the complit it your self. For more information see to doc from u-boot.
This is how I compiled it.
First compile OPENSBI
$ cd /tmp
$ git clone --dept 1 --branch v1.6 https://github.com/riscv-software-src/opensbi.git
Cloning into 'opensbi'...
remote: Enumerating objects: 513, done.
remote: Counting objects: 100% (513/513), done.
remote: Compressing objects: 100% (465/465), done.
remote: Total 513 (delta 52), reused 250 (delta 32), pack-reused 0 (from 0)
Receiving objects: 100% (513/513), 575.15 KiB | 10.85 MiB/s, done.
Resolving deltas: 100% (52/52), done.
warning: refs/tags/v1.6 958c08fa3d21612f6fdc684395011e040e9c8c22 is not a commit!
Note: switching to 'bd613dd92113f683052acfb23d9dc8ba60029e0a'.

You are in 'detached HEAD' state. You can look around, make experimental
changes and commit them, and you can discard any commits you make in this
state without impacting any branches by switching back to a branch.

If you want to create a new branch to retain commits you create, you may
do so (now or later) by using -c with the switch command. Example:

  git switch -c <new-branch-name>

Or undo this operation with:

  git switch -

Turn off this advice by setting config variable advice.detachedHead to false

$ cd opensbi
$ make CROSS_COMPILE=riscv64-linux-gnu- PLATFORM=generic FW_OPTIONS=0 FW_TEXT_START=0x40000000
Loaded configuration '/tmp/opensbi/platform/generic/configs/defconfig'
Configuration saved to '/tmp/opensbi/build/platform/generic/kconfig/.config'
 CC-DEP    platform/generic/platform.dep
 CC-DEP    lib/sbi/riscv_asm.dep
 CC-DEP    lib/sbi/riscv_atomic.dep
 AS-DEP    lib/sbi/riscv_hardfp.dep
 CC-DEP    lib/sbi/riscv_locks.dep
 CC-DEP    lib/sbi/sbi_ecall.dep
 CC-DEP    lib/sbi/sbi_ecall_base.dep
...
...
...
 OBJCOPY   platform/generic/firmware/fw_jump.bin
 AS        platform/generic/firmware/fw_payload.o
 CPP       platform/generic/firmware/fw_payload.elf.ld
 ELF       platform/generic/firmware/fw_payload.elf
 OBJCOPY   platform/generic/firmware/fw_payload.bin
So we have OPENSBI, now build U-Boot
$ cd /tmp
$ git clone --dept 1 --branch v2025.07-rc3 https://github.com/u-boot/u-boot.git
Cloning into 'u-boot'...
remote: Enumerating objects: 38201, done.
remote: Counting objects: 100% (38201/38201), done.
remote: Compressing objects: 100% (31307/31307), done.
remote: Total 38201 (delta 7245), reused 32889 (delta 6329), pack-reused 0 (from 0)
Receiving objects: 100% (38201/38201), 50.35 MiB | 42.26 MiB/s, done.
Resolving deltas: 100% (7245/7245), done.
warning: refs/tags/v2025.07-rc3 5c221a09d58511bef3f99874a2bfa076128d36bc is not a commit!
Note: switching to '2ca1398a5ece8d33d8feb6b410e6e38588b5d2bc'.

You are in 'detached HEAD' state. You can look around, make experimental
changes and commit them, and you can discard any commits you make in this
state without impacting any branches by switching back to a branch.

If you want to create a new branch to retain commits you create, you may
do so (now or later) by using -c with the switch command. Example:

  git switch -c <new-branch-name>

Or undo this operation with:

  git switch -

Turn off this advice by setting config variable advice.detachedHead to false

Updating files: 100% (36214/36214), done.
$ cd u-boot
$ make CROSS_COMPILE=riscv64-linux-gnu- starfive_visionfive2_defconfig
  HOSTCC  scripts/basic/fixdep
  HOSTCC  scripts/kconfig/conf.o
  YACC    scripts/kconfig/zconf.tab.c
  LEX     scripts/kconfig/zconf.lex.c
  HOSTCC  scripts/kconfig/zconf.tab.o
  HOSTLD  scripts/kconfig/conf
#
# configuration written to .config
#

$ # with CONFIG_CMD_PCI and CONFIG_PCI_INIT_R to no, we will not init the pci (nvme) in u-boot. Not all AMDGPU like the "probe" from u-boot.
$ sed -i -e 's/CONFIG_PCI_INIT_R=y/CONFIG_CMD_PCI=n/g' .config
$ sed -i -e 's/CONFIG_PCI_INIT_R=y/CONFIG_PCI_INIT_R=n/g' .config
$ make CROSS_COMPILE=riscv64-linux-gnu- OPENSBI=../opensbi/build/platform/generic/firmware/fw_payload.bin CONFIG_DEFAULT_FDT_FILE=starfive/jh7110-starfive-visionfive-2-v1.3b.dtb
scripts/kconfig/conf  --syncconfig Kconfig
  UPD     include/config.h
  CFG     u-boot.cfg
  GEN     include/autoconf.mk
  GEN     include/autoconf.mk.dep
...
...
...
  LD      spl/u-boot-spl
  OBJCOPY spl/u-boot-spl-nodtb.bin
mkdir -p spl/dts/
  FDTGREP spl/dts/dt-spl.dtb
  COPY    spl/u-boot-spl.dtb
  CAT     spl/u-boot-spl-dtb.bin
  COPY    spl/u-boot-spl.bin
  SYM     spl/u-boot-spl.sym
  MKIMAGE u-boot.img
  COPY    u-boot.dtb
  MKIMAGE u-boot-dtb.img
  BINMAN  .binman_stamp
  OFCHK   .config
Create bootable SD-Card #
So we now have a compiled U-boot. Time to put it on a SD-Card (partitiontable must be GPT not MBR)
I will create the default 2 boot partitions and a bigger one so we can put the debian kernel en setup (initramfs) on it.
On my machine my SD-Card reader is on /dev/sdb so:
# create the correct boot partitions to boot (needs sudo)
$ sudo sgdisk --clear \
    --set-alignment=2 \
    --new=1:4096:8191 --change-name=1:spl --typecode=1:2E54B353-1271-4842-806F-E436D6AF6985 \
    --new=2:8192:16383 --change-name=2:uboot --typecode=2:BC13C2FF-59E6-4262-A352-B275FD6F7172 \
    --new=3:16384:500000 --change-name=3:setup --typecode=3:BC13C2FF-59E6-4262-A352-B275FD6F7173 \
    /dev/sdb
[sudo] password for opvolger:
The operation has completed successfully.
# format the setup partition (may you get a Proceed anyway? question)
$ sudo mkfs.ext4 /dev/sdb3
Creating filesystem with 241808 1k blocks and 60480 inodes
Filesystem UUID: 3293ff0d-cf67-4e73-b520-8e41c68fe867
Superblock backups stored on blocks:
        8193, 24577, 40961, 57345, 73729, 204801, 221185

Allocating group tables: done
Writing inode tables: done
Creating journal (4096 blocks): done
Writing superblocks and filesystem accounting information: done
# now put the firmware on partition 1 and 2
$ sudo dd if=/tmp/u-boot/spl/u-boot-spl.bin.normal.out of=/dev/sdb1
293+1 records in
293+1 records out
150047 bytes (150 kB, 147 KiB) copied, 0,0301388 s, 5,0 MB/s
$ sudo dd if=/tmp/u-boot/u-boot.itb of=/dev/sdb2
6076+1 records in
6076+1 records out
3111253 bytes (3,1 MB, 3,0 MiB) copied, 1,19107 s, 2,6 MB/s
# now mount and copy the boot files from debian to the 3th partition
$ mkdir /tmp/mnt
$ sudo mount /dev/sdb3 /tmp/mnt
$ sudo cp ~/Downloads/DebianTrixie/dtb/starfive/jh7110-starfive-visionfive-2-v1.3b.dtb /tmp/mnt/jh7110-starfive-visionfive-2-v1.3b.dtb
$ sudo cp ~/Downloads/DebianTrixie/install/* /tmp/mnt/
$ sudo umount /dev/sdb3
The SD-Card is now ready
But the debian-trixie-DI-rc1-riscv64-DVD-1.iso on USB #
I used balenaEtcher to flash the iso on a USB device.
Run the Debian Setup #
Put on eMMC on the StarFive VisionFive 2 to install Debian on. Put the USB with the iso on an USB-slot and put the SD-Card in the SD-Card slot.
Lets Boot!
I have a serial connection to my StarFive VisionFive 2 running on boot. It will look someting like this: (start a serial connection for example with screen -L /dev/ttyUSB0 115200, how to connect to serial see this pdf)
U-Boot SPL 2025.07-rc3 (Jun 09 2025 - 18:21:24 +0200)
DDR version: dc2e84f0.
Trying to boot from MMC2

OpenSBI v1.6
   ____                    _____ ____ _____
  / __ \                  / ____|  _ \_   _|
 | |  | |_ __   ___ _ __ | (___ | |_) || |
 | |  | | '_ \ / _ \ '_ \ \___ \|  _ < | |
 | |__| | |_) |  __/ | | |____) | |_) || |_
  \____/| .__/ \___|_| |_|_____/|____/_____|
        | |
        |_|

Platform Name               : StarFive VisionFive 2 v1.3B
...
...
...

U-Boot 2025.07-rc3 (Jun 09 2025 - 18:21:24 +0200)

CPU:   sifive,u74-mc
Model: StarFive VisionFive 2 v1.3B
...
...
...
Net:   eth0: ethernet@16030000, eth1: ethernet@16040000
starting USB...
No USB controllers found
       scanning usb for storage devices... 0 Storage Device(s) found
Working FDT set to ff71b200
Hit any key to stop autoboot:  0
StarFive #
I hit a key to stop boot.
# reset to all the defaults environment settings
$ env default -a
## Resetting to default environment
$ saveenv
Saving Environment to SPIFlash... Erasing SPI flash...Writing to SPI flash...done
OK
# now have a look at the 3th partition of the SD-Card (mmc 1 == SD Card, mmc 0 == eMMC)
$ ls mmc 1:3
            ./
            ../
            lost+found/
    38025   jh7110-starfive-visionfive-2-v1.3b.dtb
 49399458   initrd.gz
 31158272   vmlinux

3 file(s), 3 dir(s)
# we see the files, we can boot to the setup of Debian
# load the kernel, devicetree and ramdisk in memory
$ load mmc 1:3 ${kernel_addr_r} /vmlinux
$ load mmc 1:3 ${fdt_addr_r} /jh7110-starfive-visionfive-2-v1.3b.dtb
$ load mmc 1:3 ${ramdisk_addr_r} /initrd.gz
# we don't need bootargs
$ setenv bootargs ''
# and boot!
$ booti $kernel_addr_r $ramdisk_addr_r:$filesize $fdt_addr_r
I everything goes correct, you will see the Debain Setup!
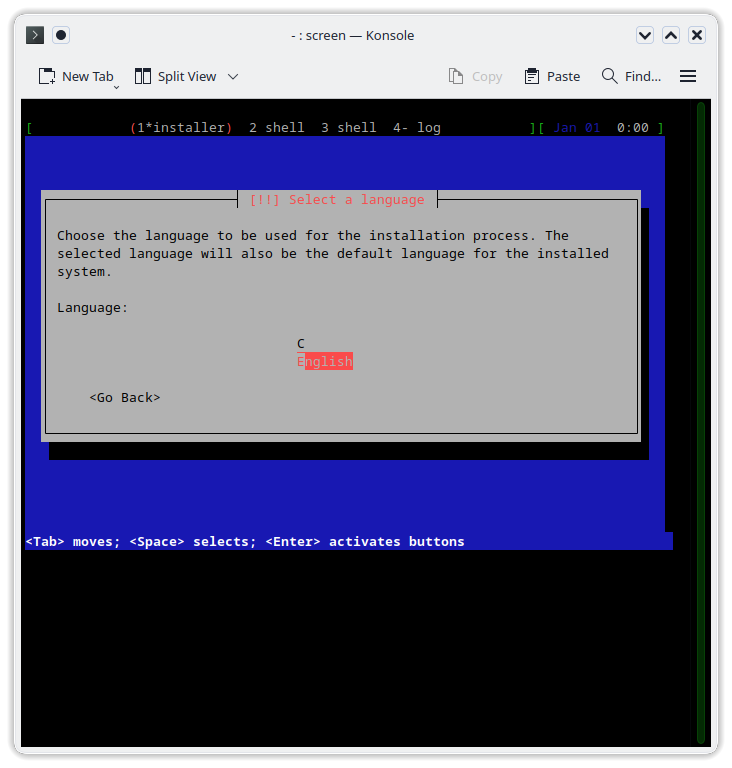
The Setup of Debian #
Set you keyboard and location, setup network and an user.
Partition disks #
I used Guided - use entire disk for Partitioning method:
By Select disk to partition, i used the eMMC MMC/SD card #1 (mmcblk0) - 61.9 GB MMC A3A561 and use sheme All files in one partition (recommended for new users).
And of course i am sure…
Configure the package manager #
Use a network mirrors, Yes! I selected debian.org not all mirrors will have the RC1 of Trixie (I think).
Continue the Architecture doesn't support "NaN passing" errors
#
Just accept it!
No boot loader installed #
The setup will give you the warning
No boot loader has been installed, either because you chose not to or because your specific architecture doesn't support a boot loader yet.

You will need to boot manually with the /boot/vmlinuz kernel on partition /dev/mmcblk0p1 and root=/dev/mmcblk0p1 passed as a kernel argument.
Thnx, now we now the kernel argument we need to boot.
First Boot #
U-Boot SPL 2025.07-rc3 (Jun 09 2025 - 18:21:24 +0200)
DDR version: dc2e84f0.
Trying to boot from MMC2

OpenSBI v1.6
   ____                    _____ ____ _____
  / __ \                  / ____|  _ \_   _|
 | |  | |_ __   ___ _ __ | (___ | |_) || |
 | |  | | '_ \ / _ \ '_ \ \___ \|  _ < | |
 | |__| | |_) |  __/ | | |____) | |_) || |_
  \____/| .__/ \___|_| |_|_____/|____/_____|
        | |
        |_|

Platform Name               : StarFive VisionFive 2 v1.3B
...
...
...

U-Boot 2025.07-rc3 (Jun 09 2025 - 18:21:24 +0200)

CPU:   sifive,u74-mc
Model: StarFive VisionFive 2 v1.3B
...
...
...
Net:   eth0: ethernet@16030000, eth1: ethernet@16040000
starting USB...
No USB controllers found
       scanning usb for storage devices... 0 Storage Device(s) found
Working FDT set to ff71b200
Hit any key to stop autoboot:  0
StarFive #
I hit a key to stop boot.
# now have a look at /usr/lib/, so we can find the correct linux-image directory name
$ ls mmc 0:1 /usr/lib/
            ./
            ../
            riscv64-linux-gnu/
    <SYM>   ld-linux-riscv64-lp64d.so.1
            tmpfiles.d/
            apt/
            dpkg/
            systemd/
      286   os-release
            locale/
...
...
...
    79296   klibc-MkFWPdInFSYtTCP4fW_ZdljVYqU.so
            dbus-1.0/
            tasksel/
            linux-image-6.12.27-riscv64/
            console-setup/
            linux-image-6.12.30-riscv64/
            cups/
...
...
...
            udisks2/
            firewalld/
            pppd/
            pm-utils/
    <SYM>   cpp
            speech-dispatcher-modules/

8 file(s), 72 dir(s)

# find the latest linux-image-6.12.xxxx-riscv64
# load the kernel, devicetree and ramdisk in memory
$ load mmc 0:1 ${kernel_addr_r} /boot/vmlinuz
$ load mmc 0:1 ${fdt_addr_r} /usr/lib/linux-image-6.12.30-riscv64/starfive/jh7110-starfive-visionfive-2-v1.3b.dtb
$ load mmc 0:1 ${ramdisk_addr_r} /boot/initrd.img
$ setenv bootargs 'root=/dev/mmcblk0p1'
# and boot!
$ booti $kernel_addr_r $ramdisk_addr_r:$filesize $fdt_addr_r
The first boot can take some time, you have to wait for the apparmor.service a long time…
TODO after first boot #
Disable sleep (freeze the system) #
sudo systemctl mask sleep.target suspend.target hibernate.target hybrid-sleep.targetRemove CD-ROM from install medium #
sudo nano /etc/apt/sources.listCommand out the line starts with deb cdrom:
Create boot.scr #
sudo nano /boot/boot.cmdput this in boot.cmd
load mmc 0:1 ${kernel_addr_r} /boot/vmlinuz
load mmc 0:1 ${fdt_addr_r} /usr/lib/linux-image-6.12.30-riscv64/starfive/jh7110-starfive-visionfive-2-v1.3b.dtb
load mmc 0:1 ${ramdisk_addr_r} /boot/initrd.img
setenv bootargs 'root=/dev/mmcblk0p1'
booti $kernel_addr_r $ramdisk_addr_r:$filesize $fdt_addr_r
now create the boot.scr from boot.cmd
sudo apt install u-boot-tools
sudo mkimage -C none -A arm -T script -d /boot/boot.cmd /boot.scr
It will now boot automaticly (in u-boot boot.scr will be loaded).
If there is a new kernel, you will need to update the boot.cmd and recreate the boot.scr file. the device-tree can become out of sync with the new kernel!